Six Things You Should Know About Video Editing

1. If you’re just starting out, you will be overwhelmed.
And that’s completely natural! Instead of beating yourself up over how un-tech-savvy you seem to be, take a couple of deep breaths and pace yourself. Take it one step at a time. Just remember that it’s only overwhelming because it’s all new material that you’re encountering. Once you start learning more about what’s what, it will get easier. Trust me. And at some point, editing will become easy enough that it won’t take up as much of your time as when you first started. (Side note: patience is required)

2. It helps to have a plan.
When you’re in the editing stage, reviewing all the footage you have, you’ll start to find yourself making notes on what you wished you could’ve done – I shouldn’t have worn that sweater, I should’ve put the camera two steps closer, I think I repeated (insert word here) too often, The lighting is too crappy, You can barely hear me, etc.

If this happens, make sure to take these notes down and consider them lessons learned. You now know what to do in the future when you’re filming and your videos will improve each time, bit by bit. Progress.

This will also get you in the habit of planning out your videos. You may not need to write a script, but it’s helpful to at least have a plan on most of the following:

  • Are you recording indoors or outdoors? What possible noise/distractions do you see happening? How can we workaround that?
  • How will you light your video? If by natural light, make sure you find a room with a big window or two. If it’s artificial, did you do a test shot of your lighting kit?
  • Are you using a mic? Whether you do or not, did you test out the sound to make sure you’ll be heard clearly?
  • Do you know what specific topic(s) you’ll be talking about? Notice that I used “topics” and not “words”. You want to try to communicate your message in the most direct way possible to avoid run-on sentences and going off tangent because if you do, you may have lost your audience’s attention.
  • What shots will you plan on using? Close-up? Wide-angle?
  • What do you need to show? What needs to be seen by your audience?

3. If you plan to have videos on a regular basis (daily/weekly/monthly) on your blog/website, it might be best to have someone else do the editing.
As a business owner, you should be focusing all of your time and energy on clients – attracting them and working with them. Having videos on your website is part of attracting clients (video marketing), but the actual process of post-production can be done by someone else. Why spend most of your day editing when you can be networking, writing guest blog posts, running a group coaching call, etc. However, if you happen to enjoy editing videos and you’ve found a way to create them in a time-efficient system/manner, then you may find yourself not needing a video editor after all.

4. Be ruthless.
When you’re deciding which clips to use for video, keep the best takes, discard the rest. Every second counts with online video – you’re working with people’s attention spans, here. While the rule of thumb is to keep videos under 2 or 3 minutes, an more important rule in my books is to deliver amazing content from start to finish. I’ve encountered short videos that couldn’t keep my attention and 15-minute videos that had me watch it until the very end. Why? Great stuff was happening in those 15 minutes that kept me engaged (and even entertained).

If your footage has something important or compelling that needs to be seen/heard by your target audience, keep it, show it, spread the word – if it’s anything less than that, that’s a cut.

Note: sometimes you’ll be tempted to keep footage that looks great visually (you look great, the lighting looks great) but I urge you to look past this. You can have eye-catching visuals but if there’s nothing else behind that, your video can become just another average video that “looks good”. You want something better than that. You want your audience to LOVE your video, so share your video with their friends and colleagues, and you want people to react to your video besides sayings “That was alright.”

5. Simplicity always wins.
You don’t need to use every single fancy effect or transition in your video editor. In fact, if you use too many different effects, they become distractions. You can play around with the different effects to find the right look/feel/style you’d like to use for your videos but ideally, you’d want to stick to 1-3 effects per category (fonts, colors, transitions, etc.) and keep using those consistently as it helps unify your videos with your brand.

6. You will always be learning. Enjoy the ride.
Don’t be afraid to experiment with your videos. I encourage you to play and have fun with video editing – this is how you’ll make discoveries on what works and what doesn’t. Once you get the basics down, there will be other features and settings waiting for you and many different looks and styles to experiment with.

17 Point “Quality Video Assurance” Checklist

Multimedia Journalist

The satisfaction that comes from completing a video project is nothing short of delightful.

It’s a great feeling, but it might be a little premature.

When you think your project is done, it’s a good time to check a few things just to make sure your video does what you intended.

If you want to maximize the quality of your project, here is a checklist of things to consider before you decide you’re done (in no particular order):

  1. Step away from your project and come back to it the next day. Does it need any changes once a little time has passed?
  2. Watch the project without sound. Does the project mostly make sense? Is it entertaining and interesting?
  3. Close your eyes and listen to the project without visuals. Is it mostly understandable, entertaining, and interesting?
  4. Play each transition separately. Does the transition work? Would it be better as a straight cut? Are there any unexpected frames or sounds? Do any transitions need adjustment?
  5. Disable music and play the project. Is the project still good without music? Music should enhance the project, not come to its rescue.
  6. If there is text on the screen, is there plenty of time to read it aloud slowly? (In other words, does the text stay on the screen long enough?)
  7. Is there anything you can cut? Does every shot serve a purpose?
  8. Does your video answer the questions: who, what, when, where, and why?
  9. Is there enough visual variety? Variety can help keep a viewer’s interest.
  10. Is there anything you could add to make it better, to improve the message, or improve the visuals? Sound effects, visual effects, titles, music, and voice-overs are tools you could consider for this.
  11. Is there anything you could remove to make the video better? (A recurring theme in this checklist is to cut, cut, cut.)
  12. Do you have permission for everything you’re using in the project? Music, photos, graphics, and people are especially troublesome areas.
  13. Is there any terminology (including acronyms) that won’t be clear to the audience?
  14. Does the opening shot make a strong first impression? The opening shot is important. Did you choose a good one?
  15. Does the closing shot leave a lasting impression?
  16. Can the video be shortened to make it better?
  17. Would your audience (and possibly a total stranger) understand and enjoy this video?

Can your video succeed without these items? It’s certainly possible.

However, when you take the time to polish your product, you’ll likely get better results.

It’s a good idea to run through a checklist like this, especially when you’re trying to make the project represent your best work.

Retrieved from Izzy Video

What To Wear For a Video Shoot and Green Screen Video

TTS Video Shoot 07-13-15_02.jpg

When you record someone in front of a green screen, you can use chroma key to replace that shade of green with another image. You can then replace their background with whatever you like.

It is best to avoid very dark or very light colors or multicolored clothing. Complicated patterns are not a good idea for any video, as they can create shimmering or flickering in the video. Neutral shades are good, as are pastel colors (as long as they are not variants of green!).

One other problem is people wearing very powerful glasses – they refract enough that you see the screen behind as they bow in the perspective of the head. It doesn’t present a problem for very high budget green screen processing, but on the lower budget shoots that don’t have access to high end keying software it can be difficult.

  • Stripes are an absolute no-no, as they introduce a waving pattern/shimmer on the video.
  • Shiny materials are not a good idea either.

With HD video it is a little more flexible because of the higher resolution, but be careful because suits with fine zig-zag patterns, while OK when shown in HD, when scaled down to normal Standard Resolution, you will see a weaving shimmer (this is known as the moiré effect).

Because the screen is green and will be effectively removed from behind you in the video, if you wear green yourself, whatever part is green will also disappear! Therefore green is not allowed. However this can be great for special effects such as missing limbs etc!

If you absolutely have to wear green (a uniform for example) let the video studio know ahead of time, and then they can use a blue screen instead.

All the normal video rules apply here too – no stripes, patterns etc.

If you are any doubt it’s best to bring a spare outfit; something you really want to wear, and a plain fail-safe outfit.

How to Buy an SD Card: Speed Classes, Sizes, and Capacities Explained

Memory cards are used in digital cameras, music players, smartphones, tablets, and even laptops. But not all SD cards are created equal — there are different speed classes, physical sizes, and capacities to consider.

Different devices require different types of SD cards. Here are the differences you’ll need to keep in mind when picking out the right SD card for your device.

Speed Class

In a nutshell, not all SD cards offer the same speeds. This matters for some tasks more than it matters for others. For example, if you’re a professional photographer taking photos in rapid succession on a DSLR camera saving them in high-resolution RAW format, you’ll want a fast SD card so your camera can save them as quickly as possible. A fast SD card is also important if you want to record high-resolution video and save it directly to the SD card. If you’re just taking a few photos on a typical consumer camera or you’re just using an SD card to store some media files on your smartphone, the speed isn’t as important.

Manufacturers use “speed classes” to measure an SD card’s speed. The SD Association that defines the SD card standard doesn’t actually define the exact speeds associated with these classes, but they do provide guidelines.

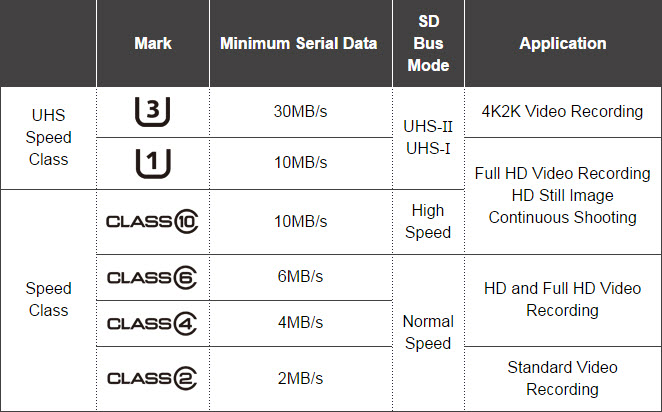
There are four different speed classes — 10, 8, 4, and 2. 10 is the fastest, while 2 is the slowest. Class 2 is suitable for standard definition video recording, while classes 4 and 6 are suitable for high-definition video recording. Class 10 is suitable for “full HD video recording” and “HD still consecutive recording.”

There are also two Ultra High Speed (UHS) speed classes, but they’re more expensive and are designed for professional use. UHS cards are designed for devices that support UHS.

Here are the associated logos, in order from fastest to slowest:

sd-card-speed-class-chart

You’ll probably be okay with a class 4 or 6 card for typical use in a digital camera, smartphone, or tablet. Class 10 cards are ideal if you’re shooting high-resolution videos or RAW photos. Class 2 cards are a bit on the slow side these days, so you may want to avoid them for all but the cheapest digital cameras. Even a cheap smartphone can record HD video, after all.

An SD card’s speed class is identified on the SD card itself. You’ll also see the speed class on the online store listing or on the card’s packaging when purchasing it. For example, in the below photo, the middle SD card is speed class 4, while the two other cards are speed class 6.

If you see no speed class symbol, you have a class 0 SD card. These cards were designed and produced before the speed class rating system was introduced. They may be slower than even a class 2 card.

sd-card-speed-classes

Physical Size

Different devices use different sizes of SD cards. You’ll find standard-size CD cards, miniSD cards, and microSD cards.

Standard SD cards are the largest, although they’re still very small. They measure 32x24x2.1 mm and weigh just two grams. Most consumer digital cameras for sale today still use standard SD cards. They have the standard “cut corner” design.

miniSD cards are smaller than standard SD cards, measuring 21.5x20x1.4 mm and weighing about 0.8 grams. This is the least common size today. miniSD cards were designed to be especially small for mobile phones, but we now have a smaller size.

microSD cards are the smallest size of SD card, measuring 15x11x1 mm and weighing just 0.25 grams. These cards are used in most cell phones and smartphones that support SD cards. They’re also used in many other devices, such as tablets.

SD cards will only fit into matching slots. You can’t plug a microSD card into a standard SD card slot — it won’t fit. However, you can purchase an adapter that allows you to plug a smaller SD card into a larger SD card’s form and fit it into the appropriate slot.

microsd-card-microsd-card-adapter-and-standard-sdhc-card

Capacity

Like USB flash drives, hard drives, solid-state drives, and other storage media, different SD cards can have different amounts of storage.

But the differences between SD card capacities don’t stop there. Standard SDSC (SD) cards are 1 MB to 2 GB in size, or perhaps 4 GB in size — although 4 GB is non-standard. The SDHC standard was created later, and allows cards 2 GB to 32 GB in size. SDXC is a more recent standard that allows cards 32 GB to 2 TB in size. You’ll need a device that supports SDHC or SDXC cards to use them.

At this point, the vast majority of devices should support SDHC. In fact, the SD cards you have are probably SDHC cards. SDXC is newer and less common.

sdhc-card


When buying an SD card, you’ll need to buy the right speed class, size, and capacity for your needs. Be sure to check what your device supports and consider what speed and capacity you’ll actually need.

Article retried from How-to-Geek